Adapters for Star Analyser gratings
You can use our Star Analyser 100 or 200 with a DSLR to produce wonderful spectra of bright stars.
How to get started in spectroscopy
Have a telescope and cooled astronomical CCD camera already? Then just screw a grating into the camera nose or your filter wheel. You can easily process the resulting spectrum (rainbow) into a scientific graph using our RSpec software.
See this short Sky & Telescope video interview. Our tutorial videos (link) and active forums (link) make it easy for you to get started. You don’t have to be a post-doc researcher with a big budget. These days, it’s surprisingly easy to capture and understand astronomical spectra.
Using a DSLR
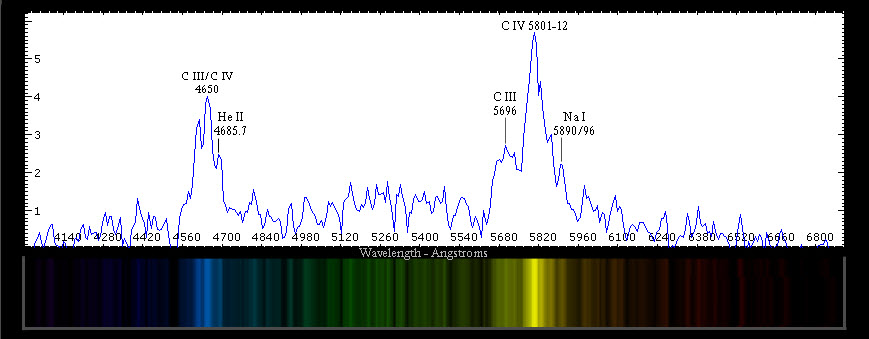
Below is a spectrum captured with just a DSLR showing a Wolf-Rayet star. See the Carbon emission lines? That’s the photosphere fluorescing from UV light! The photosphere on a Wolf-Rayet star is a dense, high-velocity wind region surrounding the star. Even with simple equipment, you can easily spot the Carbon peaks because Doppler shift from the winds has widened them. (Wikipedia link)
(Image courtesy of Janet Simpson: Canon 350D, EF 85mm, Star Analyser 100, and an AstroTrac mount. 30-second exposure, F1.8, x 6 stacked, ISO 400)
You can capture images like the one above with your DSLR. Our AD-58 adapter attaches a Star Analyser grating to your DSLR lens. (See photo below.) This is called an “objective grating” configuration. It produces spectra that are two or three times better in resolution when compared to mounting your grating between a telescope and camera. Aperture iAlthough it’s possible to capture spectra without a tracking mount, it can be quite challenging. We encourage you to use a tracking mount (link).
Note: Using a Star Analyser grating requires that you already be somewhat proficient at capturing images of stars. You need to be able to locate specific stars in the sky. And you will need to be able to capture images of them that are properly exposed, well-focused, and not smeared from their movement through the sky. We’re happy to coach you on how to get started in astronomical imaging if you need to acquire these skills.
This is an excellent way to get started if you don’t have a telescope. Great for use in educational settings.
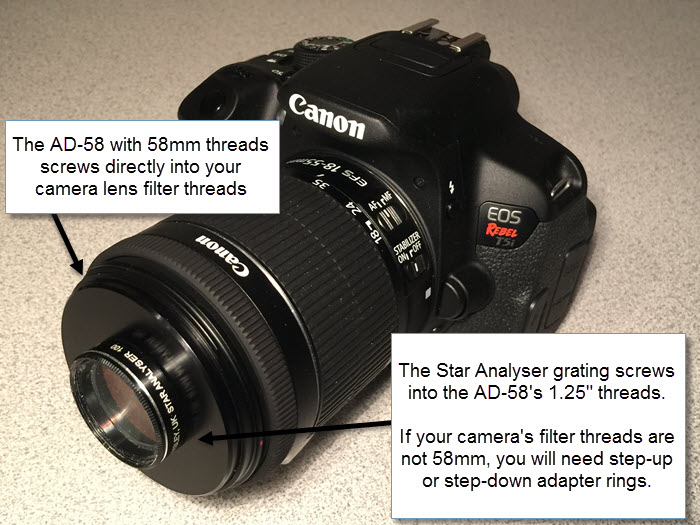
Above: Our adapter is made of black-anodized, light-weight aluminum. It screws into your DSLR lens cap/filter threads. Your grating then screws into the adapter. Use it with a Star Analyser, a Rainbow Optics Star Spectroscope, or any filter grating (including nebula filters, etc.)
Your Star Analyser or Rainbow Optics StarSpectroscope grating (or any 1.25″ filter) screws directly into the 1.25″ inner threads of our AD-58 as shown above.
For the best spectra, use with an 85 to 150 mm lens. You don’t even need a driven mount — although it’s a lot more challenging without one. For brighter objects, simply orient your grating so that the star-drift is perpendicular to the dispersion direction. For additional information on capturing spectra with a DSLR and tripod, see our pdf on drift spectra:

Technical details: Our adapter’s male threads are 58 mm and screw into the female filter (lens cap) threads on the front of your DSLR lens.
Adapter Rings
If the filter threads on your camera lens are not 58 mm, you’ll need a step-down or step-up ring.
If you order an adapter ring, “From”-end of the ring should have male threads that match your lens’ filter threads. This is generally referred to as the “first dimension.”
The “To”-end of the ring should be 58 mm female into which our AD-58 screws. And this, not surprisingly, is considered the “second dimension.”
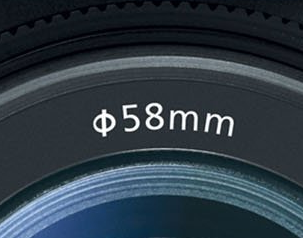
Q. “How can I determine the diameter of my camera’s lens’ filter threads?”
A. Some lens contain an imprint that shows their diameter. For example, the image below indicates 58 mm diameter lens threads:
If your camera does not have a call-out like the one above, you will need to do some research on your specific lens. Often, vendors’ spec sheets will indicate the lens cap/filter thread size. If your camera’s filter threads are less than 58mm, you need a step-up ring: link. If your camera’s filter threads are more than 58mm, you need a step-down ring: link. Also see their sets: link. Pay particular attention to their delivery times, which vary from size to size. Also (although a bit more expensive) see Adorama (link) and B&H (link).
Contact us with questions (link) or visit your local camera shop and tell them you have a 58mm filter you want to mount on your camera lens.
The cost for the AD-58 is only $42 plus shipping and handling. Available now! Click here to order.
Need Custom Parts for mounting your Star Analyser on your camera?
We are big fans of PreciseParts. They’re professional, friendly, and make great custom parts. They specialize in astronomical equipment. Their site has an excellent online tool to design your custom parts. Or you can contact them directly for ordering: http://preciseparts.com.
Use our AD-T2 adapter to attach to your camera’s T-Ring
We also offer our AD-T2 adapter that mounts a grating into a 42 mm T-Ring that you already own. Refer to the photo below to see how it works. Total distance from the camera sensor to the grating when using our AD-T2 is about 60 mm. Depending on your hardware geometry, additional spacers may improve the spectra: link. (The AD-T2 is not for use on webcams, whose sensors are too small for this spacing)
The cost for the AD-T2 is only $42 plus shipping and handling. Available now! Click here to order.
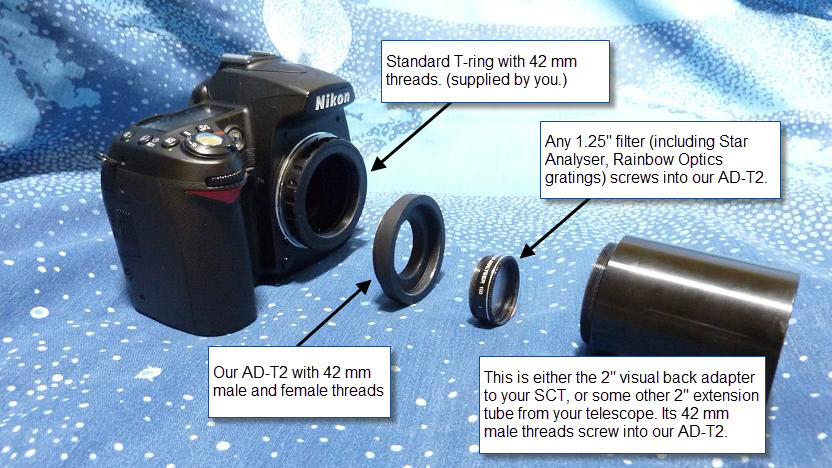
Our AD-T2 adapter sits in your T-Ring and nests a Star Analyser 100/200, Rainbow Optics StarSpectroscope, or any 1.25″ filter.
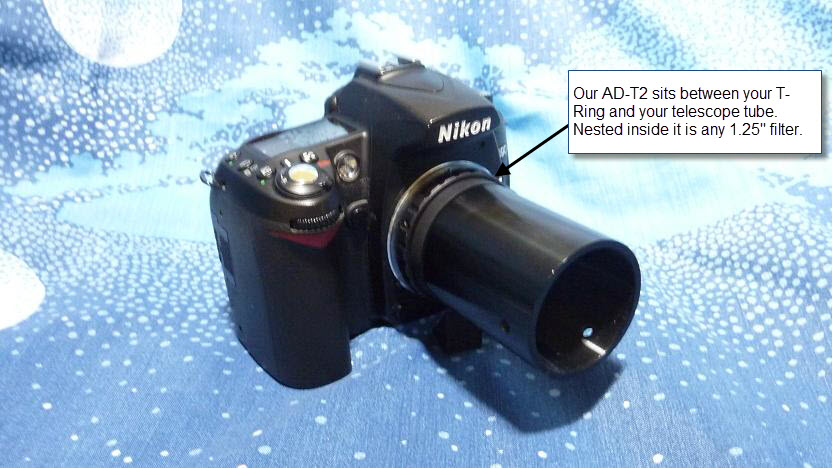
Our AD-T2 sits between your T-Ring and extension tube and holds a Star Analyser, Rainbow Optics, or any other 1.25″ filter.
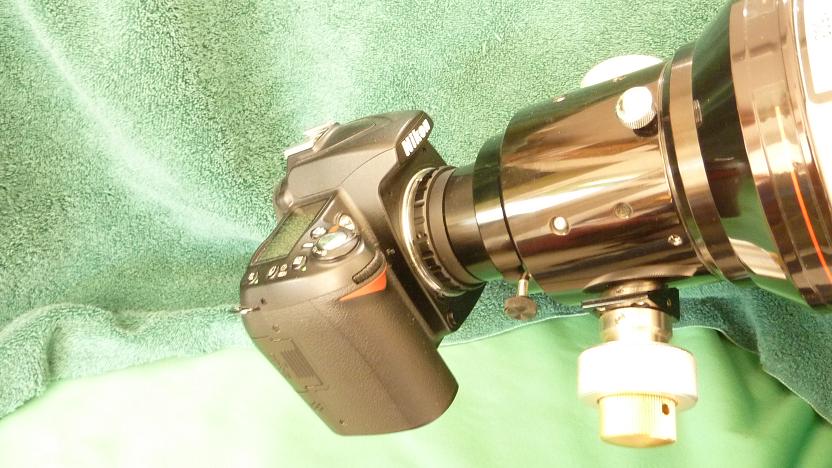
Camera and AD-T2 mounted on a telescope