The Star Analyser SA-100, SA-200 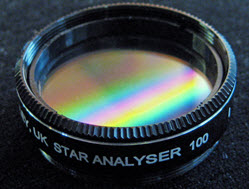
The Star Analyser 100 grating screws onto your camera nose or filter wheel
The Star Analyser 100 grating screws onto your camera nose or filter wheel
Our Star Analyser 100 (SA-100) grating is designed specifically for amateur astronomical spectroscopy. It can be mounted on your telescope just like any other 1.25″ filter. It’s is easy to use and works with most cameras. Capturing the spectrum of a star is easy! Use our grating, a DSLR or small telescope, and our award-winning software.
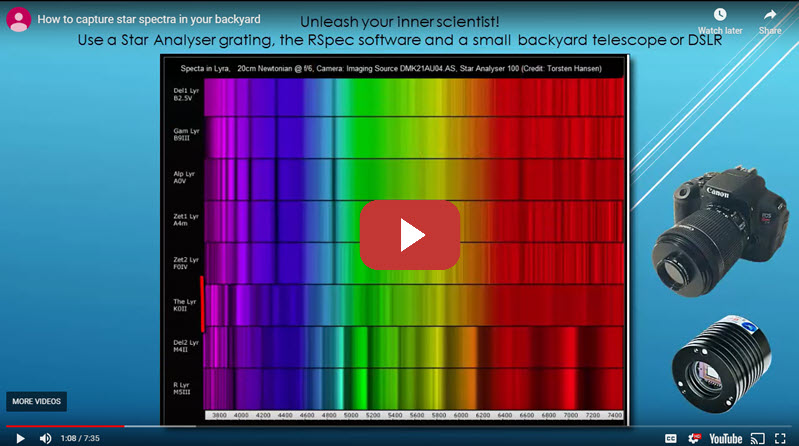
The video below shows some exciting examples of what you can do with a Star Analyser:
Also, check out our samples page (link) for some great sample work done by amateur spectroscopers.
The $195 Star Analyser 100 is a diffraction grating with grooves that are spaced at 100 lines/mm. The grating is durably mounted in a standard 1.25″ filter cell and is protected on both sides with anti-reflection coated glass.

You don’t have to have to be a Ph.D. to capture and understand the spectra of stars! With our gratings and software, it’s amazingly easy. We have customers using these gratings on webcams, DSLRs, modern video astronomy cameras, and of course FITS images from cooled or uncooled astronomical CCDs. We have gratings in stock and we can ship you one today — see our online store: link.
Note: To use a Star Analyser grating, you need to capture images of deep space objects. This means you will need to locate specific stars in the sky. And you will need to be able to point your telescope at those stars and capture images that are properly exposed, well-focused, and not smeared by star-movement through the sky. If you don’t have those skills, you will need to acquire them before successfully using a Star Analyser. We’re happy to coach you on how to acquire these skills: contact form link.
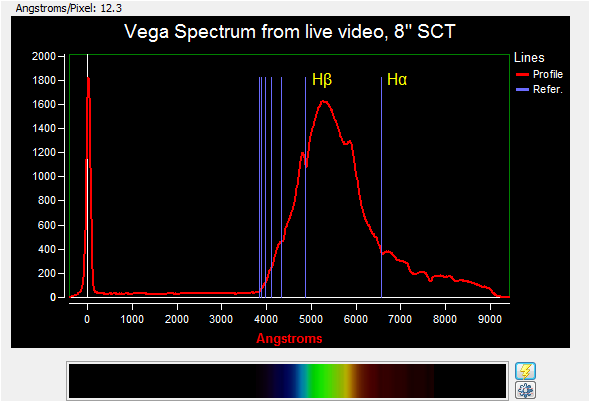
Below is a real-time view of the spectrum of Vega made with a Star Analyser, an 8″ SCT, and just a $50 webcam. Your FITS or DSLR camera would, of course, be even more sensitive. The observing location for this spectrum was just 4 miles from the center of a large metropolitan city. This spectrum was displayed in real-time with our RSpec software. The red line is an intensity graph of the star’s spectrum. The blue calibration lines show where we’d expect to see dips due to the star’s Hydrogen absorbing light. Notice that the red curve has dips exactly where the blue lines predict:
With the Star Analyser, you can:
- detect Neptune’s methane atmosphere.
- determine any star’s OBAFGKM star type and temperature from its spectra curve.
- identify the composition of a star or nebula from its emission and absorption lines
- detect the red-shift of a distant quasar!
- measure the blue shift of a supernova’s expanding shell as it races towards us at millions of miles/hour.
- watch the spectral evolution of a nova as it goes through its different phases.
Click on this link to see some wonderful spectra taken with a Star Analyser and processed with RSpec, our real-time spectroscopy software.
Use a Star Analyser like any 1.25″ filter cell on your astronomical CCD camera
You can get amazing results mounting your grating on the nosepiece or filter wheel of your current FITS CCD or astronomical video camera. You can also use our grating on a DSLR mounted on your telescope. Scroll down for more info on that use.
With almost all telescopes and cameras, the Star Analyser works “right out of the box” to produce great spectra in RSpec. A good rule of thumb is that the grating should be between about 30 and 80 mm from your sensor.
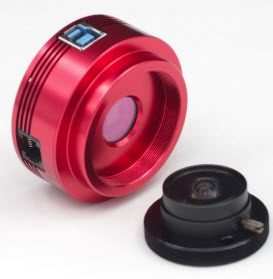
The Star Analyser grating mounts on FITS CCD cameras and astronomical video cameras like the one above.
How to use a 1.25″ Star Analyser on a system that uses 2″ filters
If your system takes 2″ filters, you will need a 2″ to 1.25″ thread adapter.
All locations:
- ZWO: 2”-1.25” Filter Adapter Ring: link. This filter is preferred in filter wheels because it doesn’t change the height of the filter. We buy these from CloudbreakOptics: link.
- See this discussion on how to use a filter drawer on 2″ systems: link.
In the US:
- Agena AstroProducts: Blue Fireball thread adapter: link.
In Europe
In Germany:
- Teleskop Service/Express: link. These will also work with the SA-100 in a ZWO filter drawer.
- Baader Planetarium: use #1508030 Baader Double T-Filterholder 1¼” and #2458110 Baader Expanding Ring T-2f / M48m.
In the UK:
- 365Astronomy: link.
Note: if your system is designed to take un-mounted drop-in filters. and our calculator calls for the SA-200, you can use our mounting kit (link) rather than a thread adapter.
Are you planning to use your Star Analyser with a ZWO 8×1.25″ filter wheel? You’ll probably need a Star Analyser 200. Also, take a look at this angle rotator: link. It not only allows easy mounting, but also rotates the grating for you when needed. See this comment on our forum: link.
Or, use the Star Analyser grating with your standalone DSLR
You can get amazing results mounting your grating on a DSLR as an “objective grating” as shown below. (More info on DSLR use at this link.)

How to get started
It’s easy to get started.
You simply need to decide whether you need our SA-100 or SA-200 (link) grating. And you need to know how to mount it on your equipment.
We’ve prepared some great tools to help you. Please visit our calculator page: link.
Have questions? Get immediate answers! Use the green chat window in the bottom corner of your screen. We’re often available and enjoy chatting.
Also, please check out our calculator page: link. When it shows 3 green flags, you’re ready to go!
What’s the difference between a Star Analyser 100, Star Analyser 200, and a Star Spectroscope?
Our SA-100 grating has grooves that are spaced at 100 lines/mm. The benefit of a 100 line/mm grating compared to a 200 line/mm grating is that for a given spacing from the camera, it produces a brighter spectrum and allows shorter exposures.
In some situations, though, the SA-100 may just not physically fit. For example, when mounting the SA-100 inside a filter wheel, space may be restricted. Or, your filter wheel may position the SA100 so that it’s too close to the CCD sensor for it to create a long enough spectrum.
In the above scenarios, we offer the Star Analyser 200 (link). Because the SA-200 is low profile, it more often fits inside the confined space of a filter wheel. And, because the SA200 spreads out the spectrum twice as much as the SA100, it can be mounted more closely to the CCD sensor.
As we suggested above, use our calculator page to determine whether the SA-100 or SA-200 is right for you: Calculator link.
What’s this “Star Spectroscope” that we refer to above? The Star Spectroscope is an older 200 line/mm grating designed primarily for visual use. Over the years, amateurs have used the Star Spectroscope and gotten good results. However, the 100 line/mm Star Analyser 100 is easier to use and gives better results in most circumstances when used with modern digital camera technology. For specific applications where a 200 line/mm grating is necessary, we offer the Star Analyser 200. Learn more about the SA-200 here.
Spacers
In some cases, adding one or two of our 10 mm spacers ($10) may produce spectra with a bit more resolution. If you mount a grating too close to your camera, you lose resolution. If you mount the grating too far away, the whole spectrum will not fit in the camera frame and dim object sensitivity is reduced as well. Use our calculator to determine the best mounting distance of your Star Analyser grating: www.rspec-astro.com/calculator. Questions? Contact our Help Desk for instant answers from experts: link.
Star Analyser used as an “objective grating”
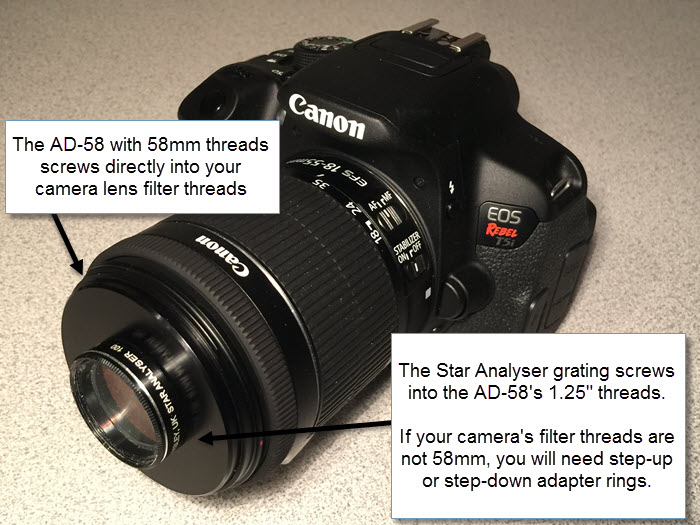
You can purchase a Star Analyser($195) in our store: link. For more details on the optional AD-58 thread adapter ($38) shown above, see this link.
If a 100 line/mm grating is good, is a 200 line/mm grating better?
That’s a great question! The short answer is no. Here’s why: We’re all familiar with the fact that at a certain point, adding additional magnification to a visual telescope can actually cause an image to deteriorate. Similar optical limitations begin to occur when going from 100 to 200 line/mm gratings.
A 200 line/mm grating, including our SA-200 grating as well as the Star Spectroscope grating, when mounted in the same position, will spread out the spectrum twice that of a 100 line/mm grating. This may give a slightly higher resolution. But, a 100 line/mm grating will have significantly better faint object performance. And often times the additional dispersion from a 200 line/mm grating doesn’t even produce better spectra. This is due to various optical limitations as described in this technical paper by Doug West: link.
Note, however, that there are some situations where a 200 line/mm grating may better serve your needs. For example, on some telescope setups, a 100 line/mm grating cannot be mounted far enough away from the camera to get good results. For example, filter wheels often have limited clearance. And when using a large aperture, long focal length telescopes, and a large sensor camera, a 200 line/mm grating may give better results because of the improved resolution that comes from the longer spectrum. For use in these situations, we offer the Star Analyser 200: link.
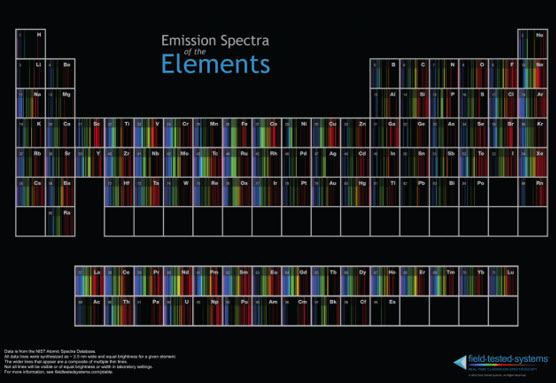
See our great Periodic Table of Spectra poster!
As our Periodic Table of Spectra below shows, each element emits its own unique color spectrum. By splitting starlight and examining the spectrum, we can identify the composition of a star, its temperature, and other physical properties. A beautiful 36 x 24″ laminated version of this poster is available for $29.95: link. Great for classrooms or your man cave or woman cave!
Spectroscopy is exciting because you’re doing real science with simple gear. We invite you to join the growing number of amateur astronomers who have discovered the thrilling adventure of spectroscopy!